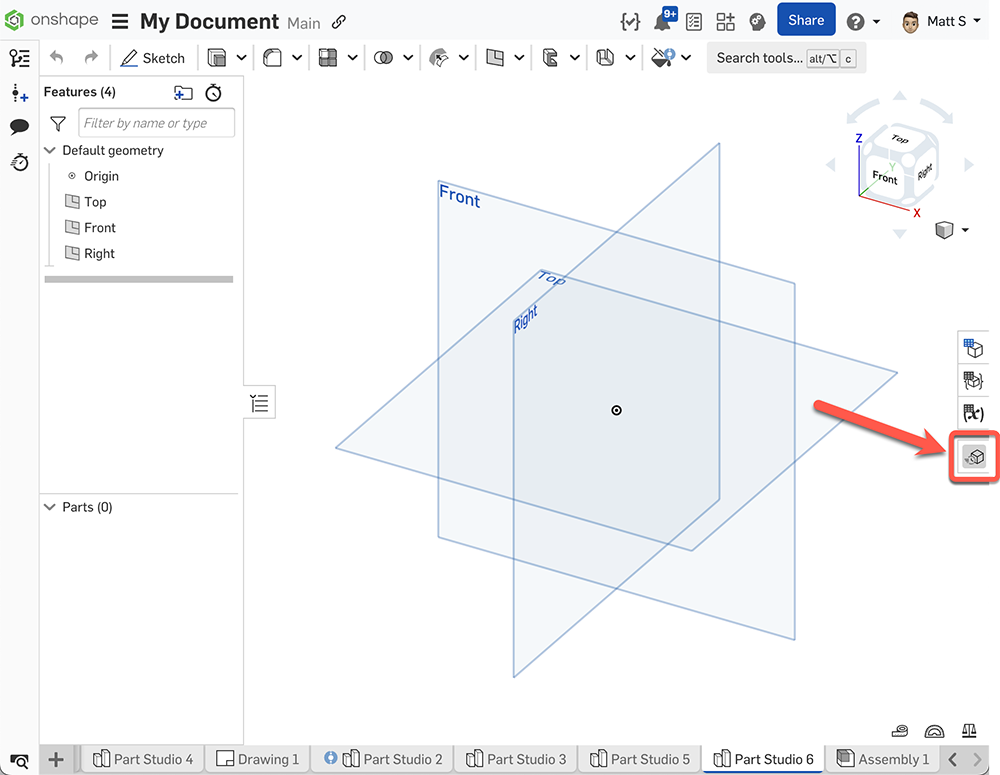
After subscribing to CAD Challenges, the app will be available as a right-pannel app within Onshape. Simply open a blank Part Studio or Assembly tab, depending on the type of challege you are attempting, and you will see the app icon on the right side of the screen, as in the image below.
After opening the app, you will be presented with a list of all of the available questions. You may filter the questions by selecting a difficulty category, Easy, Medium, or Challenging. Or you may search for specifc questions using the search bar. Clicking a question will reveal the "Start this question" button, as well as some details about the question such as average modeling time.
Make sure you are in an empty part studio tab and click the "Start this question" button to begin modeling. If you are not in an empty part studio tab, you will receive an error message.
Once you click the start button, the timer will begin and you will be presented with a standard part drawing with dimensioned 2D orthographic views, and usually a shaded isometric view. There is also a title block at the bottom. Use the views and dimensions to model the part, accurately and quickly.
When you are done modeling, press the "Submit" button. Your part will be assessed based on various mass properties and a table will indicate whether your part matches the expected values or not. If not, you can keep modeling and re-submit.
If your model is correct, Congratulations! You will see some stats on your modeling and an opportunity to provide feedback. Click the home button and keep going!
Through the CAD Challenges app, a lot of people will be creating the same models. As a result, we have the opportunity to do some interesting research on the various ways that the same geometry can be created.
While the front-end of the app supports CAD modelling challenge questions with automatic geometric evaluation of correctness, the back-end of the app also collects a selection of design data from the users to support research studies.
Each of the following sections details one type of design data that the app is currently collecting. However, at different occurrences, different types of data are being collected (see the data collection section for more details).
For every change made in an Onshape document, an immutable microversion is automatically created and logged by Onshape in the document's history. When the data is recorded in the app, the username of every microversion entry (as obtained from Onshape's API) is automatically removed. This data type is retrieved using the Document/getDocumentHistory API endpoint (ref).
The microversion history is stored as a list of JSON objects in reversed chronological order. Every element of the list stores the description of one microversion. An example of a microversion description is shown below:
            {
                "date": "2022-12-15T16:11:34.613+00:00",
                "canBeRestored": true,
                "description": "Part Studio 1 :: Insert feature : Sketch 1",
                "userId": "888888888888888888888888",
                "microversionId": "b54e0c116a5957a5e8f16a8f",
                "nextMicroversionId": "97c088c56cc53473e43d9bfb"
            }
In an Onshape Part Studio, the models in the Part Studio are constructed and defined by a list of parametric features (i.e., the feature list). The definition of all features in the list, including the semantic naming of and the parameters specified to the features, can be retrieved using the PartStudio/getPartStudioFeatures API endpoint (ref).
In an Onshape Assembly, the feature list refers to the list of mate features used to define the relationship between part instances. The feature list definition can be retrieved using the Assembly/getFeatures API endpoint (ref).
All feature list definitions are stored in JSON format, as it is output from the API response.
In both Onshape Part Studio and Assembly, a shaded view image of the workspace can be taken using the API with the view angle specified by a view matrix. For every occurrence of shaded view image capture in the app, two isometric views are taken from the model. Every isometric projection is defined by a 45 degree rotation of a vertical axis, followed by a rotation of arcsin(1/sqrt(3)) degrees about a horizontal axis. By default, all images are in the size of 128 x 128 pixels, and pixel size is automatically sized to fit the output image dimensions. With two images, all six faces of the view cube are captured:
FRT image captures the front, right, and top face of the view cube BLB image Capture the back, left, and bottom face of the view cubeShaded view images are captured using the PartStudio/getPartStudioShadedViews API endpoint (ref) in Part Studio and the Assembly/getAssemblyShadedViews API endpoint (ref) in Assembly. Data stored in the app is in the following JSON format, where all images are base64 encoded, replacing the xxxxxx:
            {
                "FRT": "data:image/png;base64,xxxxxx",
                "BLB": "data:image/png;base64,xxxxxx"
            }
For Part Studios only, all parts in the model can exported in mesh representation to allow geometric analysis of the product. The mesh data is first retrieved using the PartStudio/exportPartStudioGltf API endpoint (ref). Then, the GLTF file is automatically converted to STL format to be stored. All stored STL files are base64 encoded to be stored as strings.
At different occurrences, as detailed in the following sections, different types of design data (as introduced in the data type section) are being collected.
After the first submission attempt, if the submitted model fails to pass the automatic evaluation, the following data are collected:
For "single-part part studio" questions and "multi-part part studio" questions:
After the successful attempt, which the submitted model passes the automatic evaluation, the following data are collected:
For "single-part part studio" questions and "multi-part part studio" questions:
[(-1, "xxx")], where xxx is the base64 encoded STL as string After the first failed submission attempt, the user is given the option to "give-up" on the question. The "give-up" button is available if and only if at least one failed submission has been made. At the point when the user gives up the question, the same types of data are collected as if the submission attempt was successful, as detailed in the previous section. However, the field for the boolean field is_final_failure will be set to be True.
This application is provided solely as a free convenience to users and is provided on an "as is" basis, without warranty of any kind, express or implied, including but not limited to the warranties of merchantability, fitness for a particular purpose, and non-infringement.
This application is not part of your Onshape subscription and Onshape has no obligations to provide support or maintenance for this application. By using this application, a user agrees and acknowledges that in no event shall PTC be liable for any claim, damages, or other liability, whether in an action of contract, tort, or otherwise, arising from, out of, or in connection with the used product, including any software vulnerabilities or security incidents.
By using this application, you are also agreeing to have anonymized data about your modelling process recorded and used for research purposes. See the documentation on data collection section to learn more.